Friday, October 21, 2011

Souveniors and Mementos

In an effort to simplify my life, I decided that I needed to get rid of thing I don't need or use.  As  I looked around I realized that despite my aversion to knick-knacks, I actually have quite a bit of them!
In my defense, most have a special memory attached to them that I am loath to part with.

Here are some of them:

This is used ballet slipper that I acquired at the gift shop of Texas Ballet Theatre after a performance I saw of The Nutcracker.  I was THAT kind of fan of ballet back then. :O)

This is a framed picture of the coast of Vera Cruz, Mexico my first trip (about 7years ago)

This is from that same trip but it was a bird-eye view of the rooftops of the town of Xalapa, Mexico.  It was a memorable trip!
This is a cute little trinket box my brother brought back from his trip to Costa Rica.  I thought it was very sweet that he thought to bring me something, and thoughtful that he got me a container of sorts.  I love to organize.  Now it houses all my hair clips. :)
This is a miniature dream-catcher I purchased at a gift shop inside the Miccossukee Reservation where I went with Kaynee and Misael one summer when I vacationed in Miami.  Really neat experience. Still have the video of the entire guided tour and the alligator show!  
This cute little dress has magnet on the back that helps me keep it on my fridge. My uncle Felipe brought it back for me from one of his trips to Mexico.  It's a miniature replica of the traditional dress of that region. 
This lovely cross was my fiance's wedding gift to me on our wedding day.  It has the date on it and a beautiful prayer...*tear* that was a magical day. ;o)
As you can imagine, we brought back a lot of souvenirs from our honeymoon (you don't get to visit Europe for free very often) but here are just a few.  This is a miniature of the Collasium in Rome. very impressive, but not as big as it seems in Gladiator. :)

Cute magnet version.  It was incredibly tall, taller than you imagined it from the outside.  And when you think about the time period in which it was built, it was a giant compared to everything else around!

This is a small bell with scenes from the quaint little town we spent the bulk of our time in: Siena in Tuscany, Italy.  It just so happened that the weekend we were there was an annual celebration of the founding of that town and there was booths everywhere in the town square all Saturday. (walking distance form our hotel) We bought this, among other things, there.  
This is a miniature replica of a tradition Japanese temple/building.  Last summer, my husband and I visited the Botanical Gardens which has a Japanese gardens area within it and purchased this in the gift shop. My husband is into all things Japan. :) 
This interesting contraption is actually made by me! I made it out of cardboard, burlap, glue, newspaper and tan coffee filters.  A crafty activity that I made in a women's meeting last year. cute!

This is a really nice Texas Rangers cup we bought this summer on our first trip to the Ballpark as a married couple. :o) Go Rangers!!

So, you see that i simply can't part with ANY of this wonderful stuff!!  Which is most of my problem with cleaning out my closets and drawers - everything MEANS something or some place or some event! :o)
What do you think?
 

Saturday, October 8, 2011

Random musings...

Been a while and I happen to have some free time to blog and so here I am.
Staring at a blank screen.  Having so much on my mind, but so little that I can say.

All I can say is that, God is the only constant. And that, somehow, in the end it will all be worth it. Somehow.

Now for some pics of a simpler time.

Me at about 1 or 2 years old in a pass port pic from my trip to Spain with my parents.

Me at about 4years old, Pre-K class pic. Don't let the angelic face fool you. :)

Me at 5years old in Kindergarten class pic. Drastic hair color change no?

Me in at about 8 years old. Second grade picture.  My mother insisted i show teeth, why i ask?!

Me at 9 years old, third grade. Turning point year for me and the toughest for my teacher!

My sweet baby brother in kindergarten (5years old).  So much tortured wisdom in his big blue eyes. Even then.

Childhood. It can be a rough time for many, but mine was pretty stable and sheltered. Full of love and safe fun with my family.  I hope to give my children even a sliver of that.

Thursday, September 22, 2011

What's my name? Where's my stuff?

Well, here's a cool idea to help young children learn their name. Recognizing, identifying the letters in their name, and writing those letters in the order they should appear in their name.

It's called a Name Puzzle; I keep my class set in this box, labeled so that they get their own. Everyone knows what their face looks like, right? :o)


  Each laminated envelope has their face clear taped to it for them to identify and choose. (I believe in enabling my students to be self-sufficient in every possible way. It takes more planning and creating but it is super awesome in the long run!)


let me preface this by saying that I LOVE VELCRO!!  I have that stuff all over my room!  It is clean, fast, and neat!  Anyway, so I put velcro on the envelope flap so that they close and open easily without having the puzzle pieces slip out.


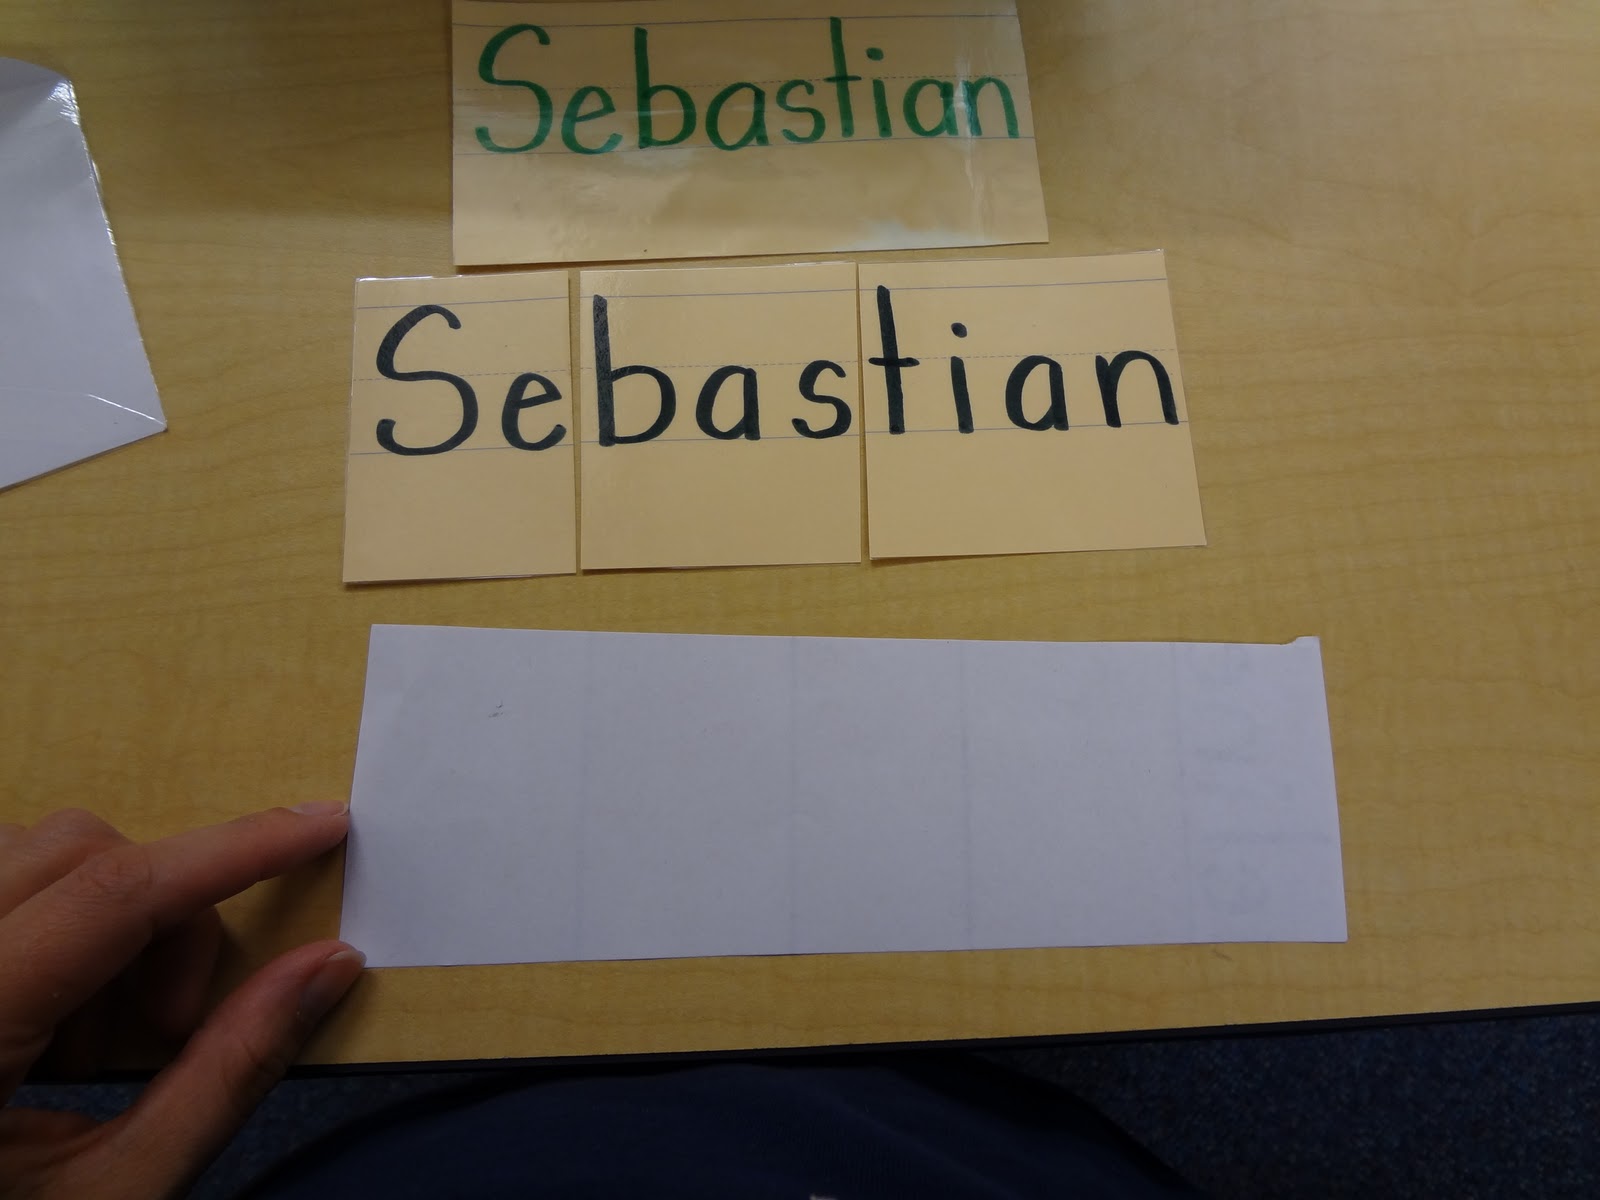
They take it to their seat and take the pieces out and the example (green) (all those parts are laminated as well. I also live off laminating things. It makes a good idea last forever, then it becomes a genius idea!) The child uses the example to see what the finished product will be like.  Then they have to arrange the letters in that order. This one is cut up into syllables, not each letter.  After the child has become more proficient in creating and writing his name, I cut it down to each letter.
To me it is very important that the child see their name written in correct print. They are learning the shape and formation of letters now and need the structure of a specific guideline....later on they can develop their own writing style.  Penmanship is under-rated.
 

After they arrange it correctly, they get a slip of paper from a stack that I have made ahead of time. They are to then copy their name onto it with crayon. The puzzle pieces come in handy because you can isolate 1-2 letters at a time for them to copy.  This is my example ....theirs will probably not look like this. :)


After the first copy they write they choose a different color and trace over the previous color, and then again a third time. So that you end up with 3 colors - Rainbow Name!

For the struggling student, I have them trace the example with crayon. (crayon writes just fine on laminated surfaces and it wipes off with a firm rub with a Kleenex) Then they can move onto the copying on the slip of paper.
They take their Rainbow Name home and they put everything else in their envelope and back into the blue box for the next day! :)


Here are pictures of my students work baskets (work supplies). A great way to, again, make them self-sufficient. It also makes my life easier too. :)

Two students share a work basket.  Their name tags are attached with velcro (they use these for center time as well)  In the basket they find everything they need to work at their tables:

Name tags

Glue for each person.

Scissors and pencils for each person as well.

And of course the mandatory set of crayons. (actually two boxes in each can)  These cans are recycled baby formula cans. perfect size and height. :)
Finally here is the Writing Journal Box per table.  It doubles as a library book storage too.


Everything has a place and everything in it's place. ;)
Here are my Writing Journals for each child:


This I attach to the first page so that I can easily keep track of their writing progress over the course of the year. I label each stage with the date at which I observe they have mastered that stage. 

This clip is to make the next blank page, easy to find. For them and me.

I stamp the date, but soon they will be able to copy the date form the board and write it themselves. They write their name and then their picture/story entry.  I take dictation from what they tell me beneath the picture.

The next blank page. I move the clip after we conference about their picture/story.
The End!

I am so tired!  But I really wanted to share this. Hope you guys enjoy it! 

Leave comments! :o)

Friday, September 16, 2011

NEw ClaSs RoOm pics!

 It's about time!  I know! I am so excited to have a new camera and even more for the quality that this one has! It has 16.2 mega pixels!!  Almost triple what I had before and man does it show!  I think you will agree. :o)
Anywho....here are new pictures i took today of my class and a few classroom management/ organization techniques I use That you might enjoy.
This is a picture of the entrance. Much less busy than last year and I'm liking that. Finally put up some student work for Open House last night.

The area from which i do most of my teaching. (Circle Time)  The large clear boxes have the books that I will be using for the theme I'm currently on. The Lazy Lady Bug is there....she helps me teach, when she wants to. ;)

This is the puzzle center table (for now) and the Sensory Table in the back to the left.  I have pinto beans in it now with a variety of 'treasures' hidden in there that they have to use their 'senses' to find and sort in clear little bottles. 
These are the baskets I decided to use this year as their children's mail boxes. Here they keep their Take-Home Folders and I place their work or anything I want them to take home. They share their basket with a partner, the one they sit with.

This is the Construction Center. The children are only allowed to play with what is on TOP of the table. I rotate the materials about every 2 weeks, depending on their interest, popularity, or the theme for the week.

One technique i use for crowd control on the centers (especially this one), is the picture clue of how many people can be there at one time.  I put up the gingerbread men and the dots and the number.  Plus, beneath the Center sign I have slots with black velcro dots where the children will place their name/face to show that they have chosen this center. Once the name/faces reach the Stop Sign, the center is full and no one else can play there at that time.  Self correcting, although I have a few creative ones that try to get away with placing their face on the ledge there...:o)

This is the Kindness Tree.  It is part of the discipline system (Conscious Discipline) that I am using in my classroom this year. I am enjoying it more than I thought, to be honest.  And so far so good with the results. The tree functions in this way: The children have learned a different behavior that we have promised to commit to every week (ie. Kind words, helping hands, big voice, etc.) If I catch them doing any of these things, they get to place a heart on our kindness tree. (the hearts are velcro'd on) The hearts are taken off and we start again every week.

This is student work that I displayed about brushing our teeth.  Mine is the big white chart paper that i used to model and talk about keeping out teeth clean etc. I love the sticky back chart paper!  I simply tear it off and stick it up anywhere to display. Instant print rich environment!
This is my Classroom helper chart.  It is pretty much self explanatory, but a fun feature is that as you can tell, that is not my whole class there as helpers. This is because some children are not ready to be any kind of helper just yet, and so the rest that aren't 'working' in the classroom are 'on vacation'. :) No one feels bad.

Close up. I created this last year and laminated everything, so i just had to whip those babies out and presto!: Helper chart assembled. :)

This is my Bilingual Pairs Chart. The children on the left column are more English dominant and the right are Spanish dominant. They will eventually have a blue or red border to denote this fact. (blue-English, red - Spanish)

Close up. It's still a work in progress and it will not be the same partners all year. It should be fluid.